Showing posts with label tutorial. Show all posts

Tuesday, January 24, 2012

Tutorial: Big Blythe Backdrop

Dear Jill,

Recently I have been finding it hard to find interesting and different places to photography my Blythes. I seem to have used every place in my house, so started wondering about backdrops.

I have seen backdrops for sale on Ebay, but they are quite pricy. But you know me - if I can find a way to make something, I will! So last week I bought myself some cardboard and decorative paper and got to work...

To make an A2 sized backdrop, you will need:


. 4x A4 sized scrapbooking card/decorative paper with a repeating pattern

. A2 sized piece of sturdy card stock (I used 2 pieces of A3, stuck together)

. Craft Glue

. Wide, Clear Cellotape

. Scissors

. Ruler

. Glue Spreader (optional, but it helps)


1. Lay your 2 pieces of A3 sturdy card stock on a large flat surface, line them up and cellotap together. I cellotaped both the front and the back of the card, to make it extra sturdy


2. Lay your 4 pieces of scrapbooking card/decorative paper out on top of your A2 piece of card. Line up each piece, starting with one of the corners, so that the 4 make a continuous piece. You don't want to be able to see any lines or pattern change if you can help it. This is why you need paper/card that has a repeating pattern. Work out in what order you're going to glue the card/paper down i.e. which bits are overlapping where. On this backdrop you can see a slight pattern change, but if it's only minimal you're not really going to notice too much :)


3. Place a small amount of glue on the back of the card - not too much, especially if you're using paper, as the glue can seep through and make the paper wobbly

4. Glue each piece of card down firmly. Any glue that seeps from the side should be carefully wiped off with a tissue.


5. Take your wide cellotape, and tape right along the outer edges of the backdrop. Try to do this in 4 continuous lengths to prevent joins being seen. Also tape quite close to the boarder, to minimise the amount of tape you are going to be able to see when photographing.

6. Lay on a flat surface, preferably with something heavy on top of it, and leave to dry.


7. Admire your work! An A2 size backdrop can be used both vertically and horizontally for Blythe, depending on what sort of angle you are shooting.

And that's how I make my backdrops! I've made quite a few of these in different patterns, and I find them really effective. Alternatively - you could use wrapping paper instead of scrapbooking card or decorative paper to cover the A2 card stock, it works just as well. I have also used 4 pieces of 12 x 12 scrapbooking stock, and just trimmed them down :)

Also, for photographing smaller objects, like Domos, you only need 1 piece of A4 card/paper, so it's even easier :)

Have fun!


Sarah
-x-

Wednesday, December 14, 2011

Attaching A Licca Body Tutorial

Dear Jill,

Adalind is beautiful! Congrats!! Lol she looks like she could be a handful!! And well done you for taking Coral out - I wish it was something I felt comfortable doing, but alas, I am a coward. Maybe someday!

Today I have for you the long awaited Licca to CCE body swap tutorial. I had totally forgotten I had the pictures for this, when I was reminded by Meester X on Flickr. Thank you for jogging my memory!

This is a tutorial about attaching a Licca Chan body to a CCE head, but it also works for attaching any body to a head where the neck hole is too big for the actual neck - including Pure Neemo body to Blythe head :)

Firstly...


This is the inside of a CCE dolls head. It's pretty similar to the Basaak/Blybes really - it has the same eye mech and spring. The thing that is very different is the neck hole. As you can see, it is very wide. That is because the neck of the CCE body...


... is also very wide. It's strange - the body is tiny but the neck's massive! Here is it compared with a Basaak/Blybe body...


Note the different neck shapes. If you tried attaching a Basaak/Blybe body, or even a Licca Chan (which has a similar neck to Basaak/Blybes) is will simply fall out of the head. The way round this...


Rubber bands! You just need to keep wrapping the bands around the part of the neck that has the little groove in it. This is how it fits onto the CCE head...


Keep adding bands until you get the sturdyness you want. The fewer bands, the wobblier the head will be. This can be a good thing, if you wanted to pose your dolls with their head slightly tipped.

When all's done, you can reattach the head, and you're done!


Pretty simple really :)

I hope this was of some help!

Sarah
-x-

Monday, October 24, 2011

Tutorial: Yarn ReRoot

Dear Jill,

Finally, I have my pictures uploaded, so here is my Yarn ReRoot tute!


You will need:
. Yarn - For this method of yarn reroot I like to use quite thick yarn, like Aran weight. You could also use Worsted Weight. I found I could do a whole head reroot with as little as 50g.

. Yarn needle - Should be as thin as you can make it, whilst still being able to slip the yarn through the eye of the needle. And it should be quite sharp so you can make new holes in the scalp.

. Ruler

. Scissors


Decide how long you want the hair, than double it (We will be using the Knot Method, with the knot in the middle). Cut loads of lengths of yarn at this length. I usually make it abit longer than I really need it so I can trim it down later.


Next you need to split the yarn. The aran yarn I use 'splits' into 3 individual lengths of yarn. I think WW split into 4, I'm not too sure...

I do this by teasing the yarn apart at the top of a piece, seperating 1 strand, then whilst holding the other 2 strands, pull the strand downwards. Do it slowly! And don't pull it too hard or it'll break.

It takes a bit of getting used to, but it is do-able :)


Do the same with the strands that are left, so you end up with individual, thin, wavy lengths of yarn.


Continue with the rest of your yarn lengths, until you have a nice pile of strands.


Next: You need to figure out how many strands are going to make up 1 plug. This bit is totally up to you - it all depends on how thick you want the hair. I usually do 2 strands per plug.

Take your 2 strands (or how ever many you are using) and tie a knot in roughly the middle of the length. Thread one end through a yarn needle.

In this picture I have already done the parting, which is where I would start. After the parting I work from the top of the head downwards.

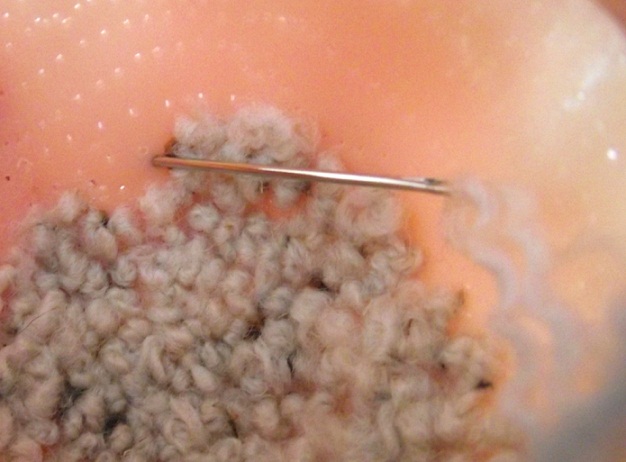
Take the needle and thread it through either an existing hole, or make a new one. You might need to make new holes if you are changing the parting line.

Pull the needle and yarn through the hole until you hit the knot.


Thread the other end of the plug through the needle and repeat, so you end up with 2 plugs for the price of one lol In my case, I used 2 strands of yarn for each plug, and there's 2 plugs, so that makes 4 strands of yarn/hair. Confused?! Lol!

Repeat along the part line and then the rest of the head. I space the plugs quite close to each other, to avoid gaps where you can see the scalp. It is quite time consuming - my first yarn reroot took a week. But with practice you can cut the time right down - I got my latest done in 2 days hehe!


Plat sections of the hair as you go, to avoid getting it all tangled up.

When you have completed the whole scalp, you need to un-plat it and thatch the parting.


Your end result!

I cut Liliths hair into a bob - it's very thick! It is great if you leave it long too - you can do all sorts of styles with it :)


I hope this was useful! :D

Sarah
-x-