Showing posts with label yarn. Show all posts

Monday, August 27, 2012

Basic Blythe Earflap Hat - Free Crochet Pattern!

Dear Jill,

I am loving the new Blythe releases! And the descriptions are hilarious!

Today I thought I'd share with you my Basic Earflap Hat pattern! In the pics below I have jazzed it up with a badge and a button, but you can do what you like with it. I don't even mind if you sell them on, as long as you don't pass the pattern on as your own work :)

I hope you enjoy!

Basic Blythe Earflap Hat

Basic Blythe Earflap Hat - Free Crochet Pattern!
You Will Need:

. DK yarn (2 colours)
. 4.5mm hook
. Approx. 1m of lace
. Button Badge
. Buttons
. Yarn needle

Abbreviations

· St/Sts – Stitch/Stitches
· Ch - Chain Stitch
· Sc - Single Crochet
· Slst - Slip Stitch
· Inc (Increase) - 2 Sc into 1 St
· ** - Marks a group of stitches to be repeated until the round is completed


Gauge

No gauge, just keep your stitches nice and tight to avoid gaps in your work. Also try the hat on your doll as you are making the hat to see if it is fitting


Finished Size

Made to fit all Blythes and Blythe Clones


Other Info

· Work in continuous rounds; in a spiral, unless otherwise stated. Don’t join at the end of a row; just keep going
· Use stitch markers or a piece of scrap yarn to mark the start of every round. Replace at the start of the next round as you go along. This will help you keep track of where you started, and saves a lot of time if things go wrong!
· I write my patterns in American terms, so Sc means Single Crochet; Dc means Double Crochet etc
. The number at the end of each round is the number of stitches you should now have
. Using a thicker yarn than DK/bigger hook than 4.5mm will result in the hat being a considerably different size to that shown.

Pattern

1. Ch 2, Sc 6 into 2nd Ch from hook, or Magic Ring 6 (6)
2. Inc around (12)
3. *Sc, Inc* around (18)
4. *Sc 2, Inc* around (24)
5. *Sc 3, Inc* around (30)
6. *Sc, Inc* around (36)
7. *Sc, Inc* around (42)
8-10. Sc around (42)
11. *Sc 20, Inc* around (44)
12-13. Sc around (44)
14. *Sc 21, Inc* around (46)
15-16. Sc around (46)
17. *Sc 22, Inc* around (48)
18-19. Sc around (48). Ch 1, turn.
20. Sc 30 (30) Ch 1, turn.
21. *Sc 2, Dec* across, plus 2 Sc (23) Ch1, turn.

Start Of Right Earflap

22. Sc 6 (6) Ch 1, Turn.
23. Sc, Dec, Dec, Sc (4) Ch 1, Turn.
24. Sc 4 (4) Ch 1, Turn.
25. Dec, Dec (2) Ch 1 Turn.
*Finish off and sew in end*

Start of Left Earflap

Count forward 12 and insert hook. You should be 6 stitches way from the edge of the back of the hat

Continue from Row 22

*Finish off and sew in end*


Edging

Attach contrasting yarn at the back of the hat, and Sc around the entire edge


Tassles

Cut 12, 12'' long pieces of yarn in the contrasting colour

Thread though the yarn needle and pull half of it through the bottom of the earflap

Continue with 6 pieces of yarn on each earflap

Plait together

Finished!

I hope you enjoyed the pattern! Any question just comment below and I will get back to you asap :)

Sarah
-x-

Friday, November 4, 2011

Introducing Lilith

Dear Jill,

I'm so glad Lola arrived at yours safely and that you love her! It's great that she has found such a wonderful home, she's a lucky girl! And Zooey and Corals eyes look fab! What a pretty bunch of girls you have!

I had a new member join our little family last week, here's my custom CCE, Lilith!


She's a CCE on a Licca Chan body, with BrainWorm eyechips. The body didn't quit fit the head socket, so I needed to improvise (tute coming soon). But apart from that she was quite easy going, I would definitely take on a CCE again. On many levels she was alot simpler than the Basaak. The only thing I wasn't keen on was the scalp, which is still to this day very floppy and big. But she has so much hair you can't really tell!

Here's a before and after:


I still have some tutes to post, plus them patterns for Blythe hats that I promised ages ago. Hopefully all this will be done in November :)

Sarah
-x-

Monday, October 24, 2011

Tutorial: Yarn ReRoot

Dear Jill,

Finally, I have my pictures uploaded, so here is my Yarn ReRoot tute!


You will need:
. Yarn - For this method of yarn reroot I like to use quite thick yarn, like Aran weight. You could also use Worsted Weight. I found I could do a whole head reroot with as little as 50g.

. Yarn needle - Should be as thin as you can make it, whilst still being able to slip the yarn through the eye of the needle. And it should be quite sharp so you can make new holes in the scalp.

. Ruler

. Scissors


Decide how long you want the hair, than double it (We will be using the Knot Method, with the knot in the middle). Cut loads of lengths of yarn at this length. I usually make it abit longer than I really need it so I can trim it down later.


Next you need to split the yarn. The aran yarn I use 'splits' into 3 individual lengths of yarn. I think WW split into 4, I'm not too sure...

I do this by teasing the yarn apart at the top of a piece, seperating 1 strand, then whilst holding the other 2 strands, pull the strand downwards. Do it slowly! And don't pull it too hard or it'll break.

It takes a bit of getting used to, but it is do-able :)


Do the same with the strands that are left, so you end up with individual, thin, wavy lengths of yarn.


Continue with the rest of your yarn lengths, until you have a nice pile of strands.


Next: You need to figure out how many strands are going to make up 1 plug. This bit is totally up to you - it all depends on how thick you want the hair. I usually do 2 strands per plug.

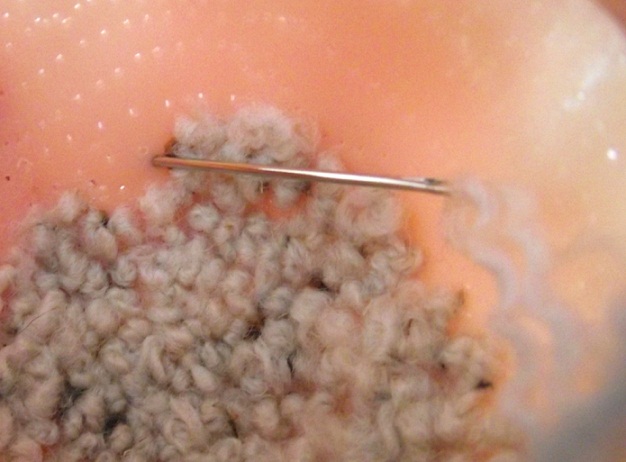
Take your 2 strands (or how ever many you are using) and tie a knot in roughly the middle of the length. Thread one end through a yarn needle.

In this picture I have already done the parting, which is where I would start. After the parting I work from the top of the head downwards.

Take the needle and thread it through either an existing hole, or make a new one. You might need to make new holes if you are changing the parting line.

Pull the needle and yarn through the hole until you hit the knot.


Thread the other end of the plug through the needle and repeat, so you end up with 2 plugs for the price of one lol In my case, I used 2 strands of yarn for each plug, and there's 2 plugs, so that makes 4 strands of yarn/hair. Confused?! Lol!

Repeat along the part line and then the rest of the head. I space the plugs quite close to each other, to avoid gaps where you can see the scalp. It is quite time consuming - my first yarn reroot took a week. But with practice you can cut the time right down - I got my latest done in 2 days hehe!


Plat sections of the hair as you go, to avoid getting it all tangled up.

When you have completed the whole scalp, you need to un-plat it and thatch the parting.


Your end result!

I cut Liliths hair into a bob - it's very thick! It is great if you leave it long too - you can do all sorts of styles with it :)


I hope this was useful! :D

Sarah
-x-