Finally, I have my pictures uploaded, so here is my Yarn ReRoot tute!

You will need:
. Yarn - For this method of yarn reroot I like to use quite thick yarn, like Aran weight. You could also use Worsted Weight. I found I could do a whole head reroot with as little as 50g.
. Yarn needle - Should be as thin as you can make it, whilst still being able to slip the yarn through the eye of the needle. And it should be quite sharp so you can make new holes in the scalp.
. Ruler
. Scissors

Decide how long you want the hair, than double it (We will be using the Knot Method, with the knot in the middle). Cut loads of lengths of yarn at this length. I usually make it abit longer than I really need it so I can trim it down later.

Next you need to split the yarn. The aran yarn I use 'splits' into 3 individual lengths of yarn. I think WW split into 4, I'm not too sure...
I do this by teasing the yarn apart at the top of a piece, seperating 1 strand, then whilst holding the other 2 strands, pull the strand downwards. Do it slowly! And don't pull it too hard or it'll break.
It takes a bit of getting used to, but it is do-able :)

Do the same with the strands that are left, so you end up with individual, thin, wavy lengths of yarn.

Continue with the rest of your yarn lengths, until you have a nice pile of strands.
Next: You need to figure out how many strands are going to make up 1 plug. This bit is totally up to you - it all depends on how thick you want the hair. I usually do 2 strands per plug.
Take your 2 strands (or how ever many you are using) and tie a knot in roughly the middle of the length. Thread one end through a yarn needle.
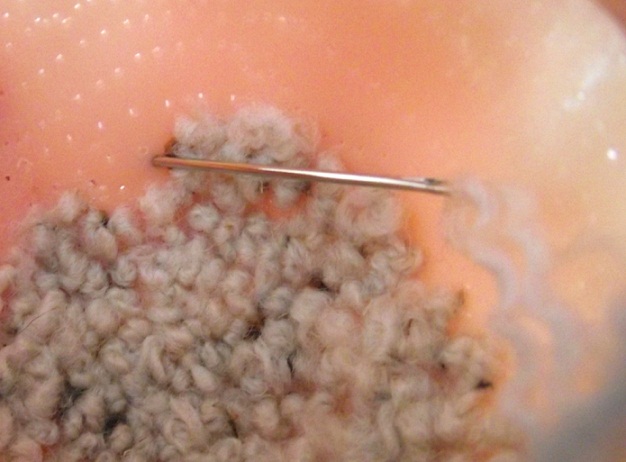
In this picture I have already done the parting, which is where I would start. After the parting I work from the top of the head downwards.
Take the needle and thread it through either an existing hole, or make a new one. You might need to make new holes if you are changing the parting line.
Pull the needle and yarn through the hole until you hit the knot.

Thread the other end of the plug through the needle and repeat, so you end up with 2 plugs for the price of one lol In my case, I used 2 strands of yarn for each plug, and there's 2 plugs, so that makes 4 strands of yarn/hair. Confused?! Lol!
Repeat along the part line and then the rest of the head. I space the plugs quite close to each other, to avoid gaps where you can see the scalp. It is quite time consuming - my first yarn reroot took a week. But with practice you can cut the time right down - I got my latest done in 2 days hehe!

Plat sections of the hair as you go, to avoid getting it all tangled up.
When you have completed the whole scalp, you need to un-plat it and thatch the parting.

Your end result!
I cut Liliths hair into a bob - it's very thick! It is great if you leave it long too - you can do all sorts of styles with it :)
I hope this was useful! :D
Sarah
-x-


